Pages

Tuesday, 28 January 2014

Creating and running an Automated Backup Verification job in VDP 5.5 Advanced

VDP 5.5 Advanced has the ability to perform an automated restore to a "sandbox" environment executed according to user defined schedules.  This allows you to perform regular automated restores of your virtual machines at specific times to ensure that you can recover those virtual machines in the event of a disaster.  The way it works is it restores the virtual machines to a specified datastore, powers it on and then waits for the VMware tools heartbeat.  Once it receives the heartbeat it will power off the virtual machine, delete it from vCenter and then class the restore as successful.  You can also configure a script to run which could perform additional tests.  To get started you need to be using the Advanced version of VDP.  Simply log into vCenter, connect to the VDP appliance and then click on the Restore tab and then Backup Verification:


Click on the Backup Verification Job Actions icon and select New:


Select the virtual machine that you want to enable the automatic backup verification job for and click Next:


If you would like to run a script within the virtual machine after the restore then enter the required information.  In this example I'm not going to bother so I'll just click Next:


You now need to specify a destination path to restore the virtual machine to.  This needs to be a specific host.  Simply click the Choose button and then navigate to the host that you would like to restore the virtual machine to and click OK:


Specify what Datastore you would like to restore the virtual machine to.  In my example I'm just going to use the locally attached datastore rather than an iSCSI or NFS datastore.  Once finished click Next:


Now select a schedule of when you would like this job to run.  In this example I'm going to run it every Sunday at 05:00.  Click Next when finished:


Give the backup job a name and click Next:


Finally verify all your settings are correct and click Finish:


The backup job should be created successfully and you should see it appear in the list:


You have now successfully created an automated backup verification job.  You can either wait until the scheduled date / time or manually run the job.  To manually run the job simply click Verify Now:


The restore job will start and you can monitor it's progress via the Task Console:


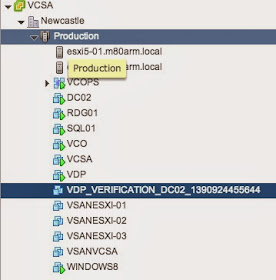
You will also see the virtual machine appear in the web client inventory view:


The virtual machine will be restored, powered on and once a heartbeat has been received from VMtools it will be powered off and then removed from the environment.  It's important to point out that the virtual machine will be connected to an internal only network so as not to interfere with production systems.  If the automated backup verification completed successfully then you will see the results in the reports tab within the VDP appliance (Just ensure you select the option to show backup verification):


You are now safe in the knowledge that your backups can be restored and you have a mechanism to prove to management or audit that these tests are being completed on a regular basis.

Wednesday, 22 January 2014

Upgrading from VDP 5.5 to VDP Advanced 5.5

In this post I'm quickly going to show you how to upgrade from VDP 5.5 (Specifically 5.5.5.180) to VDP Advanced 5.5.  I have VDP 5.5 running in my home lab obviously for backup purposes but I want to look into the product further, specifically the replication and automated backup verification features which are only available with the advanced version.  The following FAQ article has some great information about the product.

So, in order to upgrade the license you should log into the vSphere Web Client and connect to the VDP appliance:


Once connected click the Add a VDP Advanced License Key which should be presented as soon as you connect.  Obviously if you have already assigned the license key on install you can ignore this:


Click on the cog icon and Assign a New License Key:


Enter the license key and click Decode:


Click on the hosts that you want to assign to this license key and click OK:


Your VDP appliance should now be licensed.  You now need to switch to the advanced version by clicking on the Switch to VDPA button in the configuration screen:


You will be presented with a warning message advising that you cannot undo this change.  Click Yes:


You will see a message advising that the upgrade was successful, click OK:


You will be asked to re-connect again and once you do if you check the Configuration tab you should see that you are now running the Advanced version:


Saturday, 18 January 2014

North East VMUG - 13/03/2014

The next UK North East VMUG has been finalised and will be on Thursday 13th March from 12:00 and take place at:

CastleGate

Simpson Room
Melbourne Street
Newcastle Upon Tyne
NE1 2JQ
Map

Once the full agenda with times has been confirmed I will update this page but here are some highlights of what we have planned:

  • Hot Topic Round Table: Join Us for a Roundtable Discussion on the Community’s Hottest Topics
  • Nimble Presentation: Nimble Customer
  • VMware Presentation: vSphere 5.5 – What’s New - Hani El-Qasem (Blog | Twitter)
  • Community Presentation: “Home Labs” with Added Demo - Michael Armstrong (Blog | Twitter)
  • VMware Presentation: vSAN - Lee Dilworth (Twitter)
  • Networking, Food & Drinks, and Raffle
  • vBeers at Bridge Hotel – Sponsored by 10Zig
Were trying something new this event by putting on a round table slot from 11:00 to 12:00 for anyone who wants to come along and talk about what there currently up to or any challenges they are currently facing and would like input from others.  Hopefully if we get a few people involved we might look to put similar sessions on at future events.  We also have a great selection of presenters which include the awesome Lee Dilworth and Hani El-Qasem.  I'll also be doing a community presentation on Home Labs whereby I'll hopefully show you a live demo of exactly what I run at home.

Sign up and Register Here

Big thanks go out to our Sponsors for the day, Nimble and 10Zig.  Without their help we wouldn't be able to put on these free events.


Tuesday, 14 January 2014

VMworld is coming to you - Edinburgh - 26/02/2014

Did you miss VMworld this year and live near Edinburgh?  Why not join us for a "VMworld is coming to you" event and find out exactly what was announced at VMworld.  This will be an all day event and will be held on Wednesday 26th February 2014 at:

Apex Waterloo Place Hotel
23-27 Waterloo Place
Edinburgh
EH1 3BH
Map

The full agenda can be found below and you can register for the event here:


Hope you see you there.

Thursday, 9 January 2014

Toastmasters in the North East

After reading an excellent article posted by Mike Laverick (Blog | Twitter) on Toastmasters and improving on your public speaking I thought I'd have a look to see if there are any Toastmaster communities in the North East.  With my recent move to VMware I'll be involved in a lot more public speaking with both customers and the general community and this is something that I have always wanted to improve on.

After a quick google search I found A1 Speakers who are affiliated with Toastmasters International.  After contacting them I was advised that the group is still going strong and meet on the 1st and 3rd Monday of the month at the Jurys Inn in Newcastle form 18:45 to 21:00.  Both myself and David Owen (Blog | Twitter) will be attending on Monday 20th so feel free to reach out to A1 Speakers and ask to be put on the guest list and join us.

Tuesday, 7 January 2014

File Level Restore with VDP 5.5

In this post I'm going to show you how to perform a file level restore for a virtual machine from the VDP appliance.  I'm currently logged on to my Windows8 VM which is being backed up via the VDP appliance:


I currently have an application called "winbox.exe" on my desktop which I plan on deleting and restoring from the last backup taken on 01/06/2014.  You first need to browse to the VDP File Level Restore webpage:

https://<VDP Appliance>:8543/flr/

You will be prompted with a login screen.  From what I can determine you need to log into the appliance with a local administrator account of the virtual machine you want to perform a file level restore for.  In my case, I'm using the local administrator account for the Windows8 VM:


After you have correctly authenticated you will be asked to select a restore point from which to perform the file level restore from.  Select the required restore point and click Mount:


You can now close the Manage mounted backups window and you should see your restore point mounted.  Now simply browse to the file that you wish to restore and click Restore selected files:


You now need to specify a destination location to restore the file to.  I'm simply going to restore it back to the desktop.  Once selected click Restore and click Yes to the popup message:


The restore is submitted and you can monitor the progress via the Monitor Restores view:


Once the restore is completed the file should be in the location you specified.